Showing posts with label sirius. Show all posts

Thursday, January 04, 2007

Installing Sirius into a Hyundai Santa Fe

This install was performed on a 2002 Hyundai Santa Fe. While my two previous installs had the benefit of being able to utilize the factory radio, the particulars of this vehicle prevented that. As such, it was necessary to replace the head unit with an after-market stereo. I ordered everything I needed from Crutchfield and I highly recommend going through them if you intend to do the same. On orders over $129, they include everything you need to install the stereo and this came in very useful.
  1. Pioneer DEH-P3800MP stereo
  2. Pioneer SIR-PNR2 Sirius receiver
  3. Hyundai in-dash receiver kit (Crutchfield part no. 003HYK1118)
  4. Hyundai wire harness receiver (Crutchfield part no. 120707301)
  5. Extra wire (about 16 guage) and butt crimps
  6. Wire connectors
The first order of business is to disconnect the negative terminal on the battery. Next, remove the components from the center of the dashboard. Start with the environmental controls by removing the ashtray and screws located there. You should be able to reach up and pull this piece out disconnecting the various wires as you go. Now you can remove two vertically-oriented screws that are connected to the top piece. Once this is done remove the piece containing the vents and digital clock.


Taking out the radio is easy now. At this point you'll want to fit your stereo into the in-dash receiver kit and adjust the included trim if necessary. My particular setup required ¼" being taken off of each side in order to get the perfect fit.


Attach the Hyundai wire harness receiver to the plug that was originally plugged into the factory radio. Color match the wires to those on the new head unit and connect them using the wire connectors. Don't worry if not all of the wires are used, just be sure those particular ends are wrapped with electrical tape.


Now we will install the Sirius receiver. You have two options: 1) Place it underneath the passenger seat or 2) Place it underneath the rear passenger seat. There are pros and cons to each but placing it under the rear seat is much tougher.

Attach the blue end of the the IP-bus cable to the back of the receiver in addition to the wire harness and FM radio antenna cable. If are you going for just the passenger seat, route the other end of the IP-bus cable behind the glove compartment, down the side and underneath the door trim which you can simply tuck it under. For those who choose the latter option, the short length of the IP-bus cable requires that you instead route it underneath the center console and carpet leading to the rear passenger seat. You'll need to loosen the center console with a ratchet and run a coat hanger under the carpet if you go with this option.


With the Sirius receiver in place, you now need to hook it up to a power source. While it's possible to reuse the path followed by the IP-bus cable, I highly recommend routing it instead along the driver's side of the car to avoid any possible interference with the signal to the head unit. In addition, this has the benefit of placing the ends of the wire directly next to the fusebox located underneath the steering column on the left side. You'll want to splice in the extra wire at this point so that it is long enough to reach. The wire can tap directly into the fuse labeled "Audio" thus ensuring that the receiver remains on when the stereo is on.


From the rear of the car, route the Sirius antenna wire down through the small space between the rear hatch and the roof. Tuck the wire into the gasket running along the edge towards the passenger side. Have it enter the car through the trim running along the roof edge and snake the wire towards the front. Depending on where you installed the Sirius receiver, route the antenna wire out from the floor through the door trim.


Make sure all wires are attached to their proper components. Reattach the negative terminal on the battery and turn the key to accessory mode. The stereo should start with FM radio selected. Press the volume control knob to select the Sirius receiver as a source. If you see 'SIRIUS' displayed then congratulations, you are ready to activate your unit and listen to the best that satellite radio has to offer.


Questions?
Email me at sean.soper@gmail.com if you have any.

Legal stuff
All brands mentioned in this document are copyright of their respective owners. I am not responsible if your equipment or vehicle malfunctions after following these instructions. You may copy this information as you see fit but please cite this article as a source if you do so.

Friday, March 10, 2006

Installing Sirius into an Audi A4

This project was originally posted on my website in September of 2005. I am reposting it here for posterity's sake. The experience I gained during this install was put to good use when I installed a Sirius receiver into my Dad's Silverado.

Project Requirements
  1. This needed to be easy to moderately difficult
  2. It needed to be simple to remove as I didn’t want to have to rip up the carpet or take half the car apart.
  3. The implementation had to look good/invisible.
Items needed
(All items listed unless noted are the Radioshack brand)
  1. JVC Sirius receiver (KT-SR2000)
  2. JVC Sirius car kit (KS-K6012)
  3. Blitzsafe 13-pin auxiliary adapter (AUDI/AUX DMX V.1)
  4. Panavise dash mount (75102-600)
  5. 20 ft. of stereo audio cable with male jacks on either end (42-3501)
  6. Stereo Y-adapter (1/8” phone plug to dual phono jack, 42-2542)
  7. Radio removal kit for Symphony radio
  8. 10 ft. of spiral cable wrap (278-1638)
  9. 3-amp fuse (250V, 5x20mm, 270-1054)
  10. Crimping tool
  11. 2 spade tongues
  12. 2 butt connectors
  13. Inline fuseholder (27-1238)
  14. 6 ft. Adaptaplug Cord (273-1641)
  15. Adaptaplug “B” (273-1705)
  16. 3/8” ratchet with 8mm socket and extension
  17. Phillips head screwdriver
  18. Small flathead screwdriver
  19. Duct tape
The total cost should come in under $300.


Slip the Sirius antenna up underneath the hat shelf as shown. With only cardboard and glass between it and the outside this is as good a place as any to put it without the hassle of having to put it on the roof or on top of the trunk. Note that it will not work underneath the trunk. Thread the wire over to the driver’s side.


Take one end of the stereo cables and thread them from the rear-seat to the trunk using a coat hanger. You will need to remove the rear seat by pulling up hard from underneath the front edge. After this you will need to remove the rear driver’s side shoulder by pulling up and out and then down. Attach the stereo cables to the Blitzsafe adapter’s phono plugs. Attach the 13-pin adapter to the CD changer’s plug.


This shows the rear driver’s side shoulder removed with the stereo cable and antenna wire running down.


With the rear seat removed and both cables coming out of the trunk, we now put them underneath the driver’s side kick panel. Use your fingers to pull the kick panel up in sections and simply push the wire up underneath. I used some spiral cable wrap about every foot to keep the wires nice and neat.


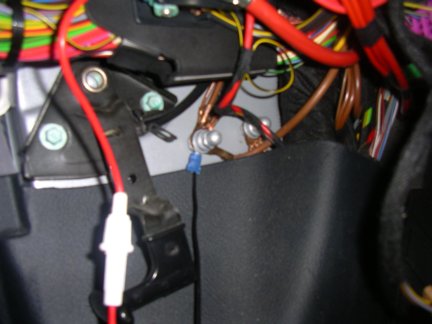
Up near the front on the driver’s side is where our cables will come out. Remove the kick panel here with the Phillips head screwdriver. In this picture you can see our cables near the door trim routed around the fuses using duct tape.

Before moving onto the next step be sure to remove the plastic piece underneath the steering column. First remove the side panel (not pictured) facing the door by slipping the small flathead underneath it and pulling it off. Remove the bolt there using the 8mm socket. Use the flathead again on the two removable plastic covers on either side of the steering column and remove those bolts. There is one more bolt that needs to be removed on the right side farther up underneath. Once these four bolts are out the piece should come off easily.


Now it’s time to make our power adapter. Crimp a spade tongue on each end of the inline fuse holder wires on one side and crimp butt connectors on the other end of the wires. Cut off one end of the Adaptaplug cord then split and strip the wires. Attach the positives (white stripe -> red wire) using the butt connector and do the same with the negatives. Don’t forget to put the 3-amp fuse inside the fuse holder.

Next attach the negative from the inline fuse holder to the ground shown in the picture above. Since we’re using a spade tongue you will only need to loosen the bolt a bit whereupon you will slide in the spade tongue and retighten the bolt. Our positive from the inline fuse is shown in the foreground.


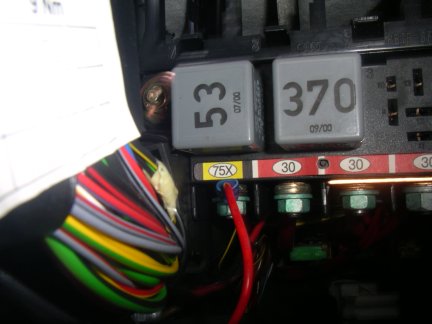
Attach the positive from the inline fuse to the post marked 75X using the spade tongue. This is “switched” power from the battery. That means that it receives power when the car is either on or in accessory mode. Use a zip tie to keep these wires up and out of the way as we don’t want them getting tangled around the hood release. Take your new power cord and attach it to the Adaptaplug “B” plug. Using a straightened coat hanger push the Adaptaplug cord, the antenna cord and the stereo cables behind the console through to the passenger side.


Using your radio removal tools, take the Symphony radio out and attach the Panavise mount as shown in the instructions which come with it. The angled ends of your four removal tools should point inwards. Grasp the radio by the tape deck and give it a good yank to pull it out. It should slide out with no problem. After you have replaced the radio and the Panavise mount is firmly in place, screw the receiver mount to the Panavise mount using the four small screws that came with the car kit.

Plug the phono jacks into the stereo cable. Wrap the visible part of the wires in the spiral cable and attach each plug to its complimentary jack on the receiver mount.


You may have to press the power button on the Sirius receiver the first time it is attached with the car turned on but afterwards it should turn on and off with the car. If everything is working properly then congratulations, you now have Sirius!

Questions?
Email me at sean.soper@gmail.com if you have any.

Legal Stuff
All brands are copyright of their respective owners. I am not responsible if your car malfunctions after following these instructions. There may be more ‘professional’ methods of installing this unit but after two weeks of various attempts and many trips to Radioshack, I believe this to be the best layman’s method.

Tuesday, December 27, 2005

Installing Sirius into a Chevrolet Silverado

This install was performed on a 2000 Chevy Silverado using the KTC-H2EC kit from Kenwood which includes the Sirius receiver and car installation accessories. In addition to this package you will also need:
  1. Panavise dashmount 751101799
  2. PIE GM9-AUX converter
  3. 6-ft shielded audio cables (Radioshack part no. 42-2483)
  4. Four 16-gauge butt crimps
  5. At least 2 ft. of 16-gauge wire
Wiring that allows for a direct connection to the vehicle's switched power is included but the included wire is too short for the Silverado's dash length. Therefore you will need to splice in an additional foot of wire using the 16-gauge wire listed. You will also use the butt crimps in this step. Be sure to splice it on the side between the in-line fuse and the connection to the car so as to not interfere with routing through the dash and into the receiver.

After splicing, you will need to open the fusebox located on the lower part of the dashboard on the driver's side. It is accessible when the door on that side is open. Attach the negative lead to the lower bolt on the inside of the fuse panel. Wrap the positive lead around one of the posts of the fuse labelled RDO #1. This will allow the unit to perform just like the radio, even staying on when the car is off until the door is opened. The labelling for the fuses can be found on the plastic piece covering the fuses.

This shows the fusebox covering removed

Next we'll want to attach the antenna for the receiver to the roof. Remove the third brakelight above the rear window using a screwdriver. Thread the antenna wire over to the passenger side using a coat hanger. On the passenger side of the car you will need to pull out the tabs holding the overhead handles in place. Once these are loose you can pull down on the handles to remove the edge of the headlining. You can then push the coat hanger through and thread the antenna wire the rest of the way down past the A-pillar and just below the glove box.


The tabs on the handles need to be pulled out

Now we'll want to get the audio portion hooked up. Make sure that the vehicle has the parking brake on and is on a flat surface. Put the key in the ignition and turn it once so that you can put the vehicle in 1st gear. As well, move the steering wheel into the lowest position. Remove the ashtry and feel underneath the bezel of the dashboard. Pull gently until you hear a click and it comes away from the rest of the dash. Continue in this fashion counter-clockwise around the edges of the bezel until you have completely removed it.

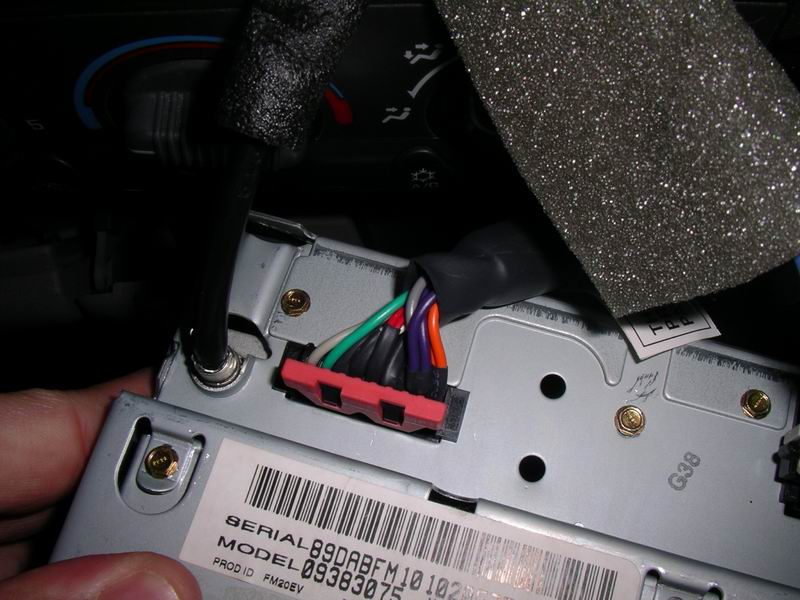
The stereo headunit is held in place by a clip on either side. Remove the unit and do the same for the environmental controls located just underneath it. Using the harness that comes with the GM9-AUX, route the end with the 9-pin connector up behind where the stereo would go leaving the other end to come out in the space below. Put some strong adhesive tape, such as duct tape, on the bottom of the GM9-AUX unit itself and place it just behind where the environmental controls would go. Plug the clear plastic connect on the harness into the GM9-AUX and plug the other end of the harness into the 9-pin connector on the back of the stereo headunit. Then plug the stereo plugs of the 6-ft. audio cable into the other side of the GM9-AUX and route the stereo wires into the compartment just right of it.


The harness included with the GM9-AUX plugs into the back of the stereo headunit


The GM9-AUX fits snugly behind the environmental controls

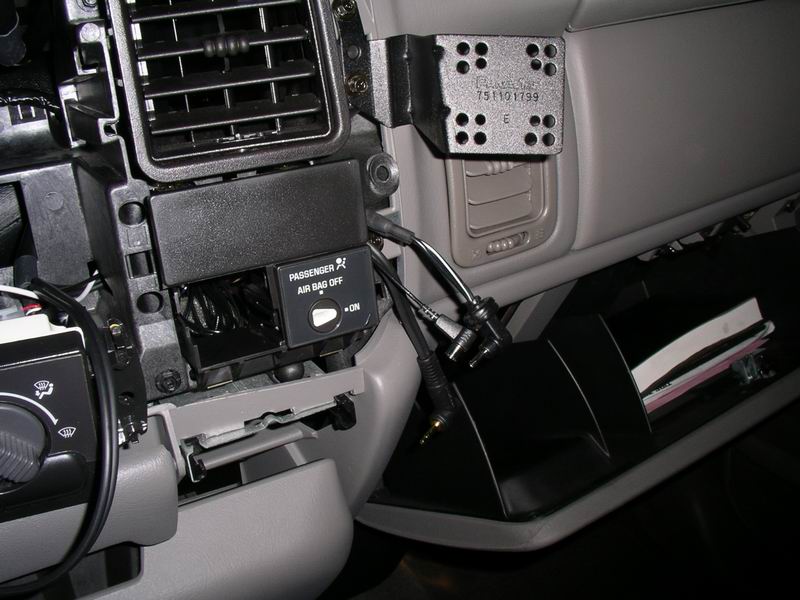
Now you'll want to route the power cable and antenna cable into the same compartment as the stereo cables were routed. Eventually these three cables will come out of the right side of the bezel via a drill hole. When drilling the bezel, keep in mind you will need a 1/2" drill size for a 3/8" grommet. As well, a small notch will need to be cut out next to the hole to fit the wires through since the right-angle plugs make fishing them through the hole impossible. At this step you will also want to finish up the antenna installation. Center the Sirius antenna on the roof using the length of the wire protector as a guide. Be sure to wipe down the area where the wire protector will go with isopropyl alcohol so that it will adhere cleanly. Reattach the third brake light after you are finished with this.


The power, stereo and antenna wires will exit the bezel on the right side


The Sirius antenna with a clean centered look

Using the bolts found on the upper right edge of the dash where the bezel would be attach the Panavise dashmount. Reattach the bezel to the dash by gently pushing in the edges of it and moving in a clockwise fashion around the rest of the bezel. Cut the 3/8" grommet in half so you can put the wires through it. Using a small jeweler's flathead screwdriver, gently push the grommet into the 1/2" drilled hole in the bezel making sure the wires are long enough to reach the dashmount. Attach the Sirius receiver's dock to the dashmount using the four small screws provided with the H2EC kit. Plug the wires into their respective inputs and plug the receiver into the dock. Provided the radio is on then your Sirius receiver should be on too though you may have to press the power button (the small upside-down red triangle) the first time. You may also need to press the CD/AUX button to select that audio input. Congratulations, you are now ready to activate your Sirius receiver and enjoy radio again.


Final installation

Questions?

Email me at sean.soper@gmail.com if you have any.

Legal stuff
All brands mentioned in this document are copyright of their respective owners. I am not responsible if your equipment or vehicle malfunctions after following these instructions. You may copy this information as you see fit but please cite this article as a source if you do so.

Friday, December 16, 2005

Howard Stern's last day on Earth

Today was Howard Stern's last day on terrestrial (or as Sirius puts it, boring and old-fashioned) radio. Being as my commute is only 30 minutes I didn't get to hear alot of it and certainly not any of the show that he did out in the street. But all-in-all it sounded like a great time was had by everybody. What is curious though is that I wouldn't have really cared much a few years ago about what was going on with the Stern show.

Back then I was only a casual listener, tuning into him when the other stations went to ads. It seemed repetitive what with the Whack Pack always on. That and it appeared that the show existed just to get the biggest gross-out [nsfw] possible. But then the FCC clamped down on him and the pro-censor activists came out in force to push him off the air. They'd been trying for years but now they had the federal government on their side.

In what has turned out to be a stunning move, Howard took what he'd been fighting nearly since the show's inception and turned it into a cause célèbre that people could rally around. Suddenly he was the symbol of a generation tired of having government censors dictate what they could hear. And our weapon of choice was not here on Earth but high up in space.

Before Howard's announcement, satellite radio was a steady but slow-growth technology for tech watchers. But since that fateful day 14 months ago (I remember every detail of what I was doing when I heard the news) satellite radios have skyrocketed in popularity. Like Prometheus bringing fire to Man, so Howard has brought censorship-free radio to America.

Let us hope that he escapes Prometheus' fate.

Thursday, November 03, 2005

Com os belos companheiros

The title of this (my first!) blog comes from a Brazilian drinking song and means "with my beautiful friends". I've only managed to memorize the first and last verses but I keep trying. Hmm, I suppose folks might be wondering what I intend to write about in this space. Brazil definitely. Audis. Sirius. Counter Strike. Oh and my newest love: Ruby on Rails.

I actually had a blog about a year ago. I set it all up on my own personal website and made my best attempt to keep it up to date. But the time between updates got longer and longer. I just figured it wasn't worth it anymore and that it was more of a blight than a nice looking feature so I took it down. Lately though I've had a lot on my mind, things that I want to get out and I figure that this is as good a place as any where the entire world can read it ;-)

I've actually been surfing the web for 10+ years now. I started with a dialup account at an outfit called CNS in my hometown of Carlsbad. I was only 16 at the time and I remember having to go out and buy an additional 8MB of RAM so I could browse the Internet graphically. I'd been using BBSes for a few years at that point so the transition was fairly gentle. But once I made it there was no turning back.

High school graduation happened a few years later followed by college graduation and recruitment by a central Florida-based company called Harris. Times were good at Harris for awhile but then things turned sour. To save this space from becoming a rant against bad management (and a few bad managers in particular) let me just cut it short by saying that I ended my tenure there to begin working at a great local company called Health First Health Plans.

In the three months since I started there I have come to love programming again. I was put in charge of taking a barely functioning web portal written by three wannabe CS guys (actually I think wannabe CT would be more apropos) and turning it into something that my company could market as a feature of their health plans. We're a lot closer to making that a reality, a month away perhaps, and the future is looking very bright.

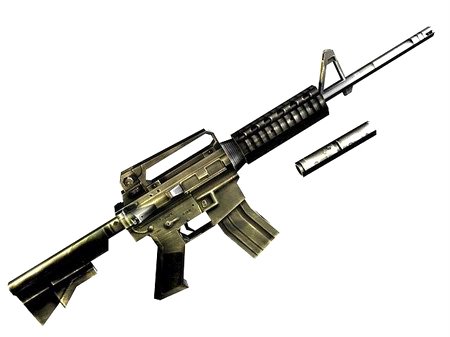
Oh, you're probably wondering about the title of my blog. It comes from the fact that my favorite weapon in Counter Strike is the M4A1 (pictured right). It's a wonderful weapon only available to Counter Terrorists but whenever I play Terrorist I always take the opportunity to steal one off the dead body of a CT. That's short for a Counter Terrorist player, not somebody degreed in Computer Technology as it was referenced above.

Anyways, I've rambled on far too long for a first blog. I will do my best however to keep this space updated, unlike some certain other bloggers I know.