
Project Requirements
- This needed to be easy to moderately difficult
- It needed to be simple to remove as I didn’t want to have to rip up the carpet or take half the car apart.
- The implementation had to look good/invisible.
(All items listed unless noted are the Radioshack brand)
- JVC Sirius receiver (KT-SR2000)
- JVC Sirius car kit (KS-K6012)
- Blitzsafe 13-pin auxiliary adapter (AUDI/AUX DMX V.1)
- Panavise dash mount (75102-600)
- 20 ft. of stereo audio cable with male jacks on either end (42-3501)
- Stereo Y-adapter (1/8” phone plug to dual phono jack, 42-2542)
- Radio removal kit for Symphony radio
- 10 ft. of spiral cable wrap (278-1638)
- 3-amp fuse (250V, 5x20mm, 270-1054)
- Crimping tool
- 2 spade tongues
- 2 butt connectors
- Inline fuseholder (27-1238)
- 6 ft. Adaptaplug Cord (273-1641)
- Adaptaplug “B” (273-1705)
- 3/8” ratchet with 8mm socket and extension
- Phillips head screwdriver
- Small flathead screwdriver
- Duct tape
 Slip the Sirius antenna up underneath the hat shelf as shown. With only cardboard and glass between it and the outside this is as good a place as any to put it without the hassle of having to put it on the roof or on top of the trunk. Note that it will not work underneath the trunk. Thread the wire over to the driver’s side.
 Take one end of the stereo cables and thread them from the rear-seat to the trunk using a coat hanger. You will need to remove the rear seat by pulling up hard from underneath the front edge. After this you will need to remove the rear driver’s side shoulder by pulling up and out and then down. Attach the stereo cables to the Blitzsafe adapter’s phono plugs. Attach the 13-pin adapter to the CD changer’s plug.
 This shows the rear driver’s side shoulder removed with the stereo cable and antenna wire running down.
 With the rear seat removed and both cables coming out of the trunk, we now put them underneath the driver’s side kick panel. Use your fingers to pull the kick panel up in sections and simply push the wire up underneath. I used some spiral cable wrap about every foot to keep the wires nice and neat.
 Up near the front on the driver’s side is where our cables will come out. Remove the kick panel here with the Phillips head screwdriver. In this picture you can see our cables near the door trim routed around the fuses using duct tape.
Before moving onto the next step be sure to remove the plastic piece underneath the steering column. First remove the side panel (not pictured) facing the door by slipping the small flathead underneath it and pulling it off. Remove the bolt there using the 8mm socket. Use the flathead again on the two removable plastic covers on either side of the steering column and remove those bolts. There is one more bolt that needs to be removed on the right side farther up underneath. Once these four bolts are out the piece should come off easily.
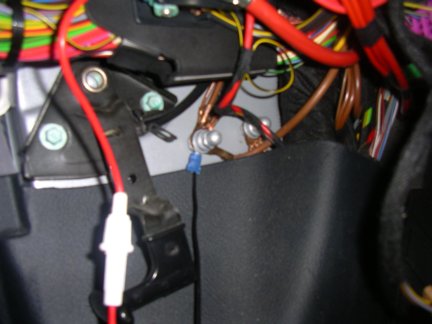 Now it’s time to make our power adapter. Crimp a spade tongue on each end of the inline fuse holder wires on one side and crimp butt connectors on the other end of the wires. Cut off one end of the Adaptaplug cord then split and strip the wires. Attach the positives (white stripe -> red wire) using the butt connector and do the same with the negatives. Don’t forget to put the 3-amp fuse inside the fuse holder.
Next attach the negative from the inline fuse holder to the ground shown in the picture above. Since we’re using a spade tongue you will only need to loosen the bolt a bit whereupon you will slide in the spade tongue and retighten the bolt. Our positive from the inline fuse is shown in the foreground.
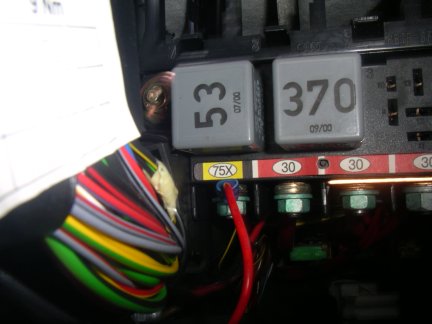 Attach the positive from the inline fuse to the post marked 75X using the spade tongue. This is “switched” power from the battery. That means that it receives power when the car is either on or in accessory mode. Use a zip tie to keep these wires up and out of the way as we don’t want them getting tangled around the hood release. Take your new power cord and attach it to the Adaptaplug “B” plug. Using a straightened coat hanger push the Adaptaplug cord, the antenna cord and the stereo cables behind the console through to the passenger side.
 Using your radio removal tools, take the Symphony radio out and attach the Panavise mount as shown in the instructions which come with it. The angled ends of your four removal tools should point inwards. Grasp the radio by the tape deck and give it a good yank to pull it out. It should slide out with no problem. After you have replaced the radio and the Panavise mount is firmly in place, screw the receiver mount to the Panavise mount using the four small screws that came with the car kit.
Plug the phono jacks into the stereo cable. Wrap the visible part of the wires in the spiral cable and attach each plug to its complimentary jack on the receiver mount.
 You may have to press the power button on the Sirius receiver the first time it is attached with the car turned on but afterwards it should turn on and off with the car. If everything is working properly then congratulations, you now have Sirius!
Questions?
Email me at sean.soper@gmail.com if you have any.
Legal Stuff
All brands are copyright of their respective owners. I am not responsible if your car malfunctions after following these instructions. There may be more ‘professional’ methods of installing this unit but after two weeks of various attempts and many trips to Radioshack, I believe this to be the best layman’s method.


No comments:
Post a Comment