
- Panavise dashmount 751101799
- PIE GM9-AUX converter
- 6-ft shielded audio cables (Radioshack part no. 42-2483)
- Four 16-gauge butt crimps
- At least 2 ft. of 16-gauge wire
After splicing, you will need to open the fusebox located on the lower part of the dashboard on the driver's side. It is accessible when the door on that side is open. Attach the negative lead to the lower bolt on the inside of the fuse panel. Wrap the positive lead around one of the posts of the fuse labelled RDO #1. This will allow the unit to perform just like the radio, even staying on when the car is off until the door is opened. The labelling for the fuses can be found on the plastic piece covering the fuses.

This shows the fusebox covering removed
Next we'll want to attach the antenna for the receiver to the roof. Remove the third brakelight above the rear window using a screwdriver. Thread the antenna wire over to the passenger side using a coat hanger. On the passenger side of the car you will need to pull out the tabs holding the overhead handles in place. Once these are loose you can pull down on the handles to remove the edge of the headlining. You can then push the coat hanger through and thread the antenna wire the rest of the way down past the A-pillar and just below the glove box.

The tabs on the handles need to be pulled out
Now we'll want to get the audio portion hooked up. Make sure that the vehicle has the parking brake on and is on a flat surface. Put the key in the ignition and turn it once so that you can put the vehicle in 1st gear. As well, move the steering wheel into the lowest position. Remove the ashtry and feel underneath the bezel of the dashboard. Pull gently until you hear a click and it comes away from the rest of the dash. Continue in this fashion counter-clockwise around the edges of the bezel until you have completely removed it.
The stereo headunit is held in place by a clip on either side. Remove the unit and do the same for the environmental controls located just underneath it. Using the harness that comes with the GM9-AUX, route the end with the 9-pin connector up behind where the stereo would go leaving the other end to come out in the space below. Put some strong adhesive tape, such as duct tape, on the bottom of the GM9-AUX unit itself and place it just behind where the environmental controls would go. Plug the clear plastic connect on the harness into the GM9-AUX and plug the other end of the harness into the 9-pin connector on the back of the stereo headunit. Then plug the stereo plugs of the 6-ft. audio cable into the other side of the GM9-AUX and route the stereo wires into the compartment just right of it.
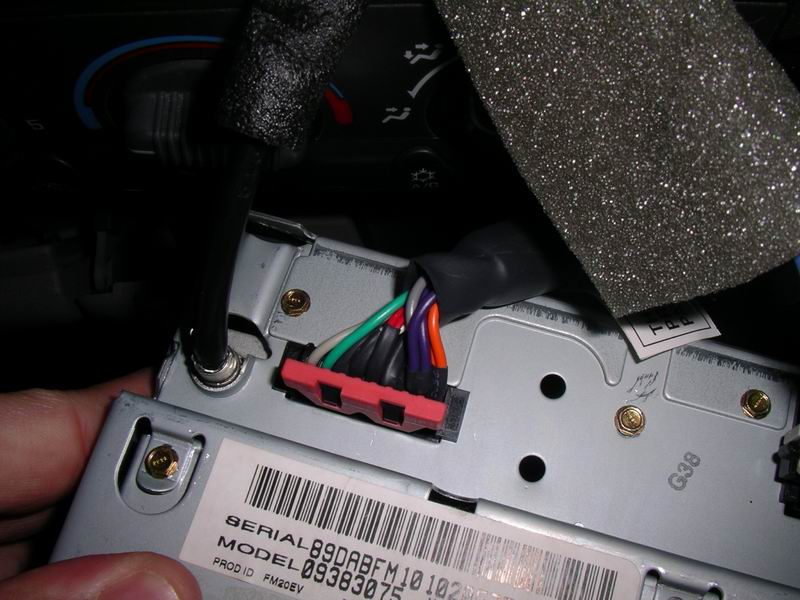
The harness included with the GM9-AUX plugs into the back of the stereo headunit

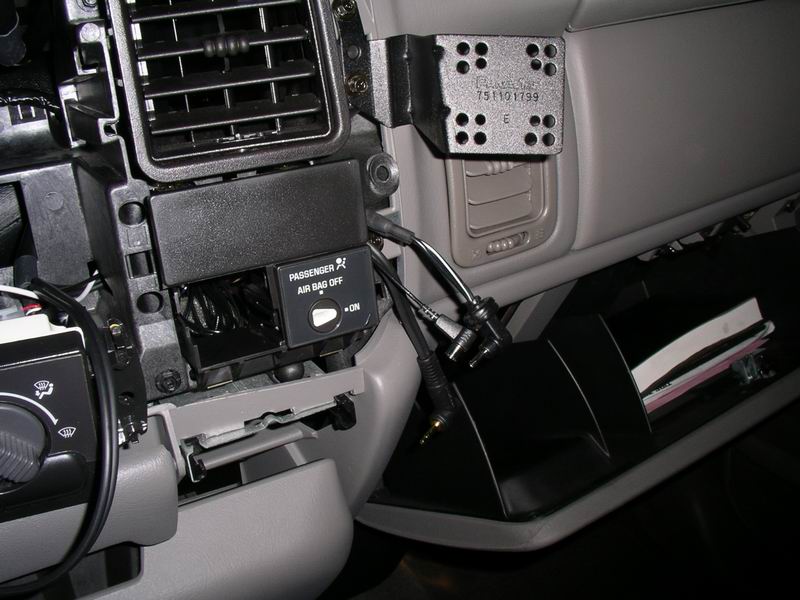
The GM9-AUX fits snugly behind the environmental controls
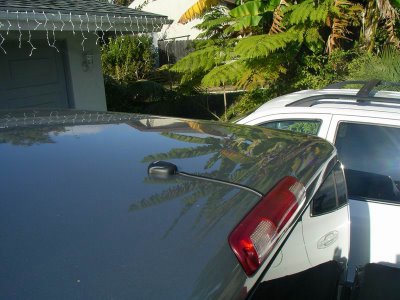
The Sirius antenna with a clean centered look
Using the bolts found on the upper right edge of the dash where the bezel would be attach the Panavise dashmount. Reattach the bezel to the dash by gently pushing in the edges of it and moving in a clockwise fashion around the rest of the bezel. Cut the 3/8" grommet in half so you can put the wires through it. Using a small jeweler's flathead screwdriver, gently push the grommet into the 1/2" drilled hole in the bezel making sure the wires are long enough to reach the dashmount. Attach the Sirius receiver's dock to the dashmount using the four small screws provided with the H2EC kit. Plug the wires into their respective inputs and plug the receiver into the dock. Provided the radio is on then your Sirius receiver should be on too though you may have to press the power button (the small upside-down red triangle) the first time. You may also need to press the CD/AUX button to select that audio input. Congratulations, you are now ready to activate your Sirius receiver and enjoy radio again.

Questions?
Email me at sean.soper@gmail.com if you have any.
Legal stuff
All brands mentioned in this document are copyright of their respective owners. I am not responsible if your equipment or vehicle malfunctions after following these instructions. You may copy this information as you see fit but please cite this article as a source if you do so.

The GM9-AUX fits snugly behind the environmental controls
Now you'll want to route the power cable and antenna cable into the same compartment as the stereo cables were routed. Eventually these three cables will come out of the right side of the bezel via a drill hole. When drilling the bezel, keep in mind you will need a 1/2" drill size for a 3/8" grommet. As well, a small notch will need to be cut out next to the hole to fit the wires through since the right-angle plugs make fishing them through the hole impossible. At this step you will also want to finish up the antenna installation. Center the Sirius antenna on the roof using the length of the wire protector as a guide. Be sure to wipe down the area where the wire protector will go with isopropyl alcohol so that it will adhere cleanly. Reattach the third brake light after you are finished with this.

The power, stereo and antenna wires will exit the bezel on the right side
The power, stereo and antenna wires will exit the bezel on the right side

The Sirius antenna with a clean centered look
Using the bolts found on the upper right edge of the dash where the bezel would be attach the Panavise dashmount. Reattach the bezel to the dash by gently pushing in the edges of it and moving in a clockwise fashion around the rest of the bezel. Cut the 3/8" grommet in half so you can put the wires through it. Using a small jeweler's flathead screwdriver, gently push the grommet into the 1/2" drilled hole in the bezel making sure the wires are long enough to reach the dashmount. Attach the Sirius receiver's dock to the dashmount using the four small screws provided with the H2EC kit. Plug the wires into their respective inputs and plug the receiver into the dock. Provided the radio is on then your Sirius receiver should be on too though you may have to press the power button (the small upside-down red triangle) the first time. You may also need to press the CD/AUX button to select that audio input. Congratulations, you are now ready to activate your Sirius receiver and enjoy radio again.

Final installation
Questions?
Email me at sean.soper@gmail.com if you have any.
Legal stuff
All brands mentioned in this document are copyright of their respective owners. I am not responsible if your equipment or vehicle malfunctions after following these instructions. You may copy this information as you see fit but please cite this article as a source if you do so.


2 comments:
nice write up. thanks. just got a silverado and im about to install all my stereo crap in, just needed some good info on removing the dash. i also like your method of getting the ant outside. will have to look at that. maybe use zipties or something instead of duck tape?
I mounted my antenna there and the problem I found is when it rained it leaked into the cab to I used some black rtv so seal around the wire where it went under the brake light
Post a Comment